6. ParaLOL Finishing - Surface Design: Cam Simulation
The process of setting up parallel finishing on Fusion 360 for the tile design CNC cutting.

The set up! Two computers are better than one. I referenced the CNC guide Bryan uploaded on the object.digital site.

Step 1: uploading and moving my model around took me wayyyyy longer to figure out than I anticipated. The first issue was that my Fusion360 account expired so I had to start a new account to upload this file.
Moving tools in this program for some reason took me ages to figure out.

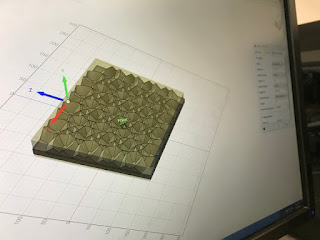
Step 2: I built a bounding box to the new specifications of 305x305x48mm. Scaling my object took a while to figure out as well, I left it overhanging the material slightly so the edge would be live and not a contained border.

Step 3: Setting up the cutting tool path

Step 4: Fusion is confusing. This issue kept happening until I realize my axis/orientation was wrong.


Step 5: Knowing this is in wood, I tried to set up a roughing pass but this caused an error I couldn't seem to resolve, so I just did a bunch of parallel passes instead.


Step 6: Parallel finishing set up and previewed


Step 7: I added 3 more parallel passes to get a cleaner, more refined result. One at 90 degrees to the original, the other two are at 40 and -45 degrees.

Step 8: saving the series of cutting and finishing process as code gurblgargle.

The set up! Two computers are better than one. I referenced the CNC guide Bryan uploaded on the object.digital site.

Step 1: uploading and moving my model around took me wayyyyy longer to figure out than I anticipated. The first issue was that my Fusion360 account expired so I had to start a new account to upload this file.
Moving tools in this program for some reason took me ages to figure out.

Step 2: I built a bounding box to the new specifications of 305x305x48mm. Scaling my object took a while to figure out as well, I left it overhanging the material slightly so the edge would be live and not a contained border.


Step 3: Setting up the cutting tool path

Step 4: Fusion is confusing. This issue kept happening until I realize my axis/orientation was wrong.


Step 5: Knowing this is in wood, I tried to set up a roughing pass but this caused an error I couldn't seem to resolve, so I just did a bunch of parallel passes instead.


Step 6: Parallel finishing set up and previewed


Step 7: I added 3 more parallel passes to get a cleaner, more refined result. One at 90 degrees to the original, the other two are at 40 and -45 degrees.

Step 8: saving the series of cutting and finishing process as code gurblgargle.


Comments
Post a Comment